When I first received the new Netduino 3 Wi-Fi I was very eager to test its GoBus functionality. There was one problem, though: the firmware it was running didn’t include the library needed for GoBus to work.
This gave me a chance to reimagine how GoBus could be implemented. I started thinking about a new, more flexible architecture that enabled complete customization while still remaining simple and easy-to-use.
I ended up implementing these ideas in an experimental GoBus library that, for the moment, I’m calling GoBusExperimental. (Catchy, I know.)
In this post I’ll start by going over my goals and some of the implementation details. If you’re just here for the cool pictures and experiments (I can’t blame you!) scroll down to the Customization section to see some of the things this library enables.
It’s important to note that everything in this library should be considered experimental. I haven’t spent much time implementing and organizing/thinking about this approach and it definitely shouldn’t be considered “final” in any way. I’m definitely open to hear suggestions for changes and improvements as well.
Goals
I designed this library with the following goals in mind:
- Ease-of-use: Previous GoBus module drivers were extremely easy to use. I wanted to keep this simplicity while adding powerful new features for people who wanted access to more custom behavior.
- Flexibility: Previously, GoBus modules could only be used with the Netduino Go mainboard. GoBus is fairly simple from a hardware perspective (most modules only need SPI; see my post here), but if you were to break out a module’s pins and connect it to a different mainboard you’d have to modify or recreate the module’s driver for it to work properly. I wanted to make it possible for module drivers to be used absolutely anywhere without modification.
- Testability: I also wanted to make it possible to perform unit tests on module drivers. More on this later.
Implementation
Let’s go over the primary concepts and C# classes and interfaces included with this library.
GoBus
The static GoBus class coordinates basic GoBus functionality (such as automatic module enumeration) and board-specific pin assignments (via conditional code blocks).
If you’re not familiar with GoBus, you can connect to and instantiate a GoBus module with code such as the following:
var display = new SevenSegmentDisplay();
There’s no need to specify the physical port the module is connected to — it’s located through a process referred to as automatic enumeration. Each GoPort is probed to retrieve the GUID of the module connected to that port (if any).
The static GoBus class contains a list of all known hubs, including the root (built-in) hub and any other custom hubs added at runtime by the user. This is the list of hubs queried by each module driver during automatic enumeration.
GoHub
The GoHub class inherits from GoHubBase, which implements the IGoHub interface. Put simply, a GoHub is a collection of GoPorts. Hubs can have additional functionality, such as port LEDs and the ability to switch port power on or off.
Most custom hub implementations could inherit from GoHubBase as it doesn’t contain any hardware-specific code, but you could, of course, implement your own IGoHub from scratch.
GoPort
This is where the magic happens. The GoPort class inherits from GoPortBase, which implements the IGoPort interface.
Everything a module needs to do, it does through the IGoPort it binds to. All SPI communication, all interaction with the GPIO pin, absolutely everything goes through the bound IGoPort.
As with GoHubBase, GoPortBase doesn’t include any hardware-specific code and could be used as a base class for most IGoPort implementations.
GoModule
GoModule is an abstract base class for all module drivers. It’s a relatively small class and mostly just coordinates basic binding and enumeration behavior.
It also contains a virtual property representing the SPI clock rate needed for communication with the particular module the driver is built for. Drivers can override this property to specify a faster clock rate if necessary.
Customization
As mentioned, this library is built with customization in mind. Everything in this section can be accomplished from user code without modifying the core GoBusExperimental library.
Most of these examples can be completed without modifying module drivers, but there are a few exceptions to this (specifically with read/write verify cycles). I’ll note the exceptions in the relevant sections.
Let’s take a look at a few examples.
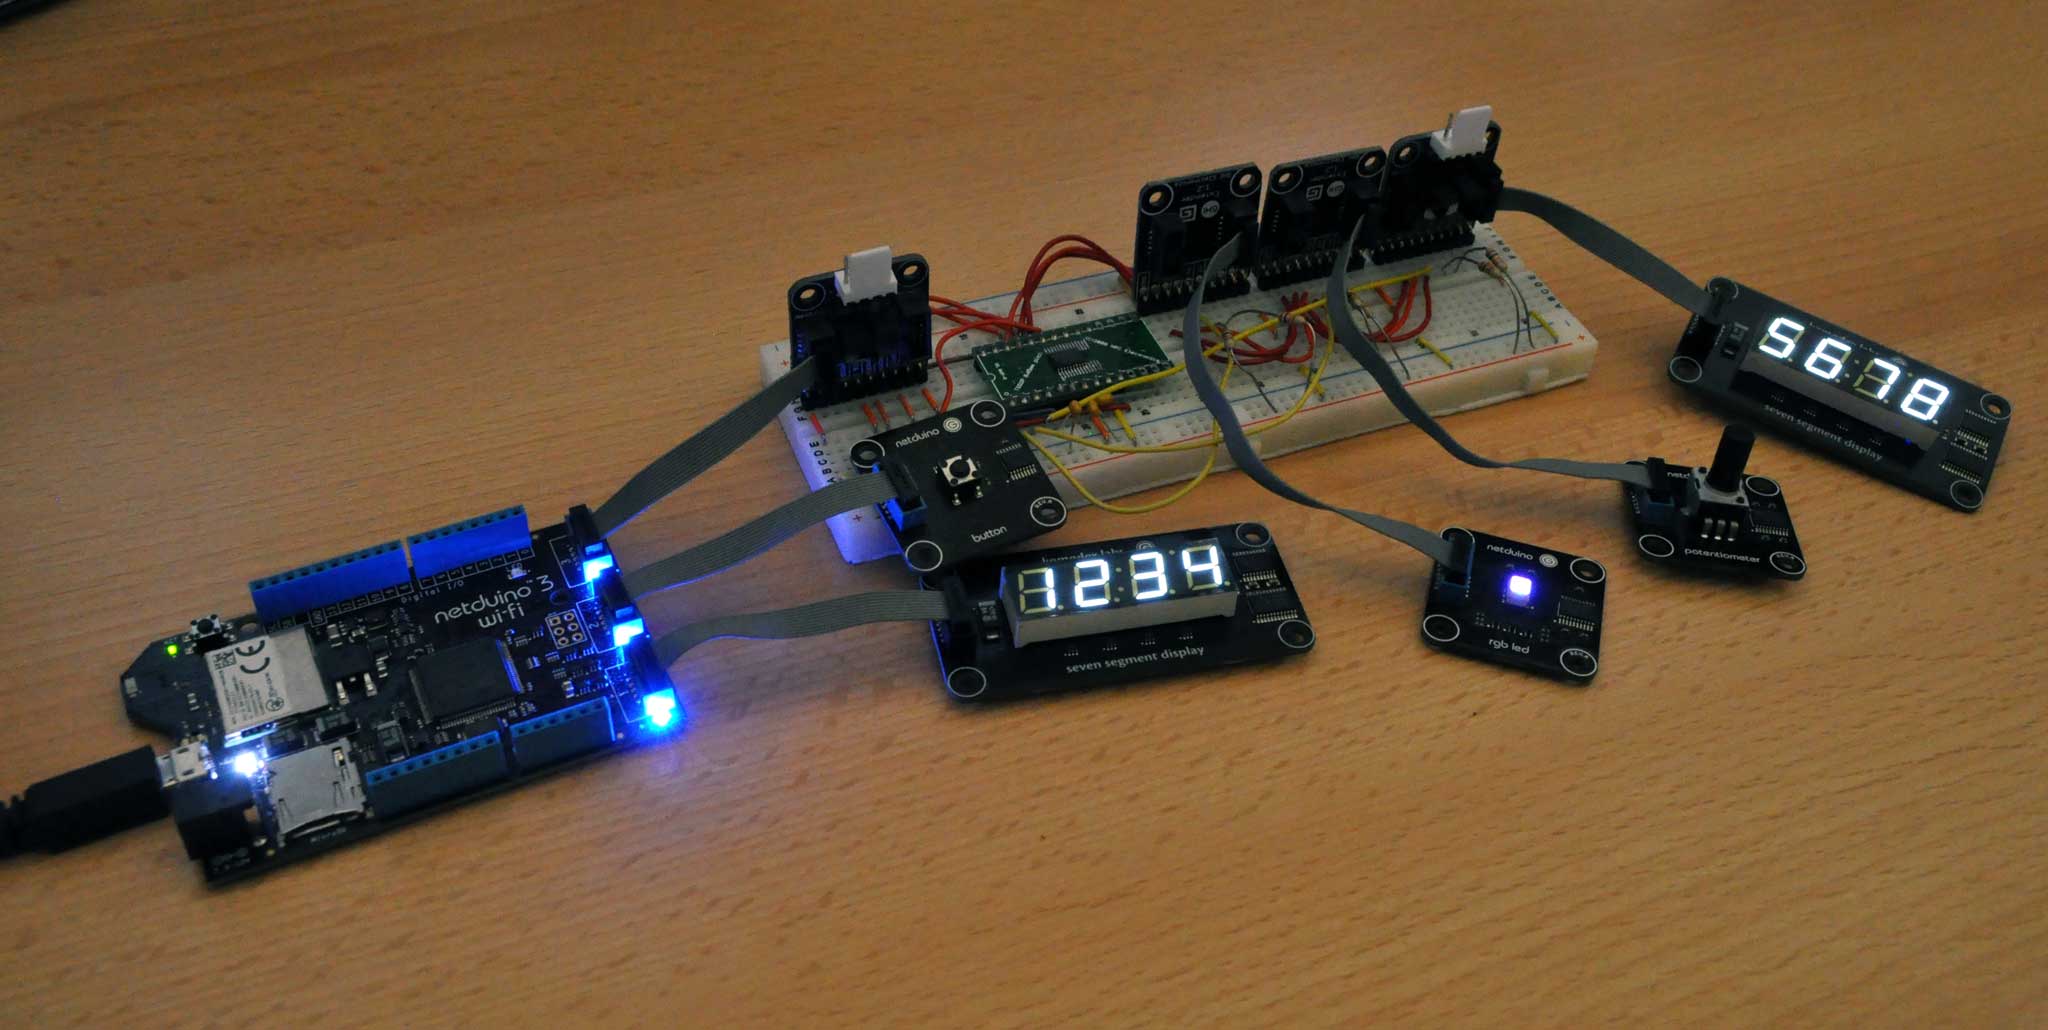
Adding a GoPort to Netduino Plus 2

This is the most straightforward example in this post. In the above photo I’m using a GoBus Breakout Module connected to pins on a Netduino Plus 2.
To connect to the module and display a value, all you have to do is instantiate a new GoPort and pass it to a new instance of SevenSegmentDisplay:
// Set up the port, specifying the pins and SPI bus it uses
var port = new GoPort(1, Pins.GPIO_PIN_D1, Pins.GPIO_PIN_D0, SPI.SPI_module.SPI1, Cpu.Pin.GPIO_NONE, Cpu.Pin.GPIO_NONE);
port.Initialize();
// Initialize the display connected to this port
var display = new SevenSegmentDisplay(port);
// Set the value to be displayed
display.SetValue(1234);
That’s all. No modifications to the module drivers. It just works.
If you want to enable auto-enumeration (perhaps if you were to attach multiple breakout boards) you can add the port(s) to a GoHub object, and then add the hub to the global GoBus class:
// Create the root hub
var hub = new GoHub();
// Set up the port, specifying the pins and SPI bus it uses
var port = new GoPort(1, Pins.GPIO_PIN_D1, Pins.GPIO_PIN_D0, SPI.SPI_module.SPI1, Cpu.Pin.GPIO_NONE, Cpu.Pin.GPIO_NONE);
// Add the port to our hub (without specifying a power pin, but using the onboard LED for indication of a bound module)
hub.AddGoPort(port, Cpu.Pin.GPIO_NONE, Pins.ONBOARD_LED);
// Add the hub to the static GoBus class (for auto-enumeration)
GoBus.AddHub(hub);
// Initialize the display with automatic enumeration
var display = new SevenSegmentDisplay();
// Set the value to be displayed
display.SetValue(1234);
Customizing GoPort LED Behavior with PWM
Each GoPort LED (on both the Netduino 3 and Netduino Go) is connected to a PWM-capable pin, but the official GoBus library doesn’t (currently) make use of this capability — each LED simply switches on or off when a module is bound/unbound.
I thought it might be interesting to be able to watch as the Netduino goes port-by-port, querying for attached modules during the automatic enumeration process. Admittedly this would be a bit more interesting on a board with more ports (such as the Netduino Go) but I haven’t had a chance to test GoBusExperimental on that board as of yet.
In the above video you can see this in action. It scans a few times for modules that aren’t actually connected, and then binds to the module that is connected. (There are some delays added between the scans — it usually happens much faster than that when the debugger isn’t connected.)
To do this, I created a new PWMHub class that inherits from GoHub and overrides some of its methods to change the way it reacts to binding and enumeration requests.
To activate this, we first have to remove the default hub and replace it with our new PWMHub:
// Get the default root hub object
var oldHub = (GoHub)GoBus.RootHub;
// Release control of power and LED output pins
oldHub.Dispose();
// Remove the default hub from the list of hubs for automatic enumeration
GoBus.RemoveHub(oldHub);

// Create the new hub and add the ports for this board (copied from the Netduino 3 Wi-Fi initialization procedure)
var hub = new PWMHub();
hub.AddGoPort(new GoPort(1, (Cpu.Pin)0x3D, (Cpu.Pin)0x30, SPI.SPI_module.SPI4, (Cpu.Pin)0x38, (Cpu.Pin)0x39), (Cpu.Pin)0x37, (Cpu.Pin)0x49);
hub.AddGoPort(new GoPort(2, (Cpu.Pin)0x3E, (Cpu.Pin)0x31, SPI.SPI_module.SPI4, (Cpu.Pin)0x48, (Cpu.Pin)0x47), (Cpu.Pin)0x3A, (Cpu.Pin)0x4B);
hub.AddGoPort(new GoPort(3, (Cpu.Pin)0x3F, (Cpu.Pin)0x32, SPI.SPI_module.SPI4, (Cpu.Pin)0x41, (Cpu.Pin)0x40), (Cpu.Pin)0x3C, (Cpu.Pin)0x4E);
GoBus.AddHub(hub);
This looks a little ugly, but all it’s really doing is recreating the GoPort objects that the base GoBusExperimental library typically creates when compiled for the Netduino 3 Wi-Fi.
After that, you can instantiate and use module drivers as normal and PWMHub automatically handles LED control.
External Hub
Ok, let’s do something a little more complex.
Above is a photo of a working (but very much experimental) 3-port GoBus hub. This hub is extremely simple and uses an STM8 as a hub controller to direct incoming SPI messages to each port. (You could almost get away with using a shift register instead of an STM8 here, but using a microcontroller enables receiving interrupt requests from hub-connected modules.)
Each port on the hub is connected to the same SPI bus as the hub controller itself. There are two new classes used to enable this behavior: ExternalHub and ExternalHubGoPort. ExternalHub acts as both a module and a hub, and ExternalHubGoPort overrides the SPI communications methods to tell the hub which module to select before sending the message.
When the message transmission completes, ExternalHub asserts the hub controller’s CS line but doesn’t actually send a message — the STM8 is programmed to deassert all hub CS lines as soon as its own CS line is asserted to avoid having a message inadvertently reach the wrong module.
Needless to say, there is a lot of room for improvement here, but it does actually work pretty well for a quick demo. I didn’t actually connect the GPIO lines for this demo but it wouldn’t take much to have the STM8 forward interrupt requests from connected modules back to the mainboard. (Without having IRQ I would recommend disabling write verification inside of module drivers to avoid delays as it repeatedly tries to verify the write.)
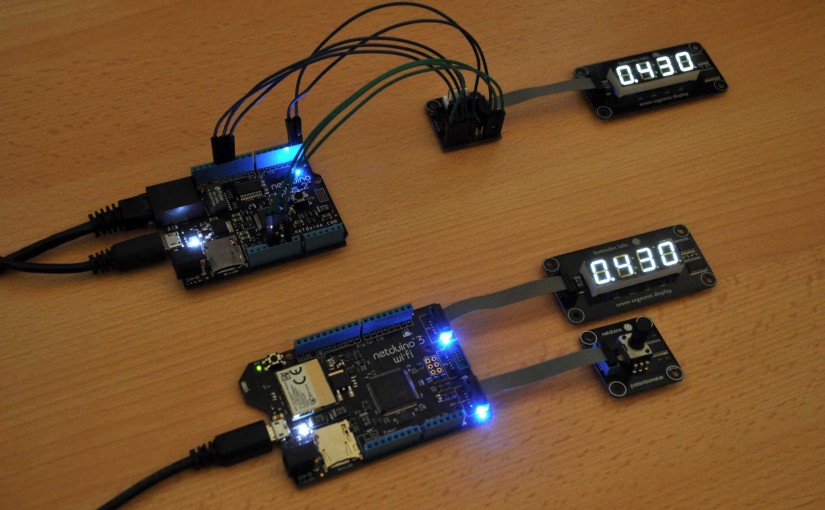
GoBus over IP
Let’s move beyond directly-connected modules. In the above video, the two boards are connected to each other only via a TCP socket. The Netduino Plus 2 acts as a GoHub server, and the Netduino 3 Wi-Fi is connected to the server through a GoHub client class.
The GoHub server passes SPI messages received from the network on to the physically connected module. The network client instantiates the module in the same way it would instantiate a directly-connected module and begins communicating with it via (remotely-executed) SPI messages. The module driver doesn’t know the difference — it just sends SPI messages to the bound IGoPort as usual.
This, of course, works with auto-enumeration. There’s no need to specify that a particular module will be connected via GoBus over IP. Just add the NetworkGoHubClient to the global list of hubs in the static GoBus class and use auto-enumeration as you would with any other module.
In the video, the Netduino 3 Wi-Fi has instantiated two Seven Segment Display modules and a Potentiomter module. It continuously reads the potentiometer’s value and sends that value to both of the connected displays.
I’ve disabled write verification in the display’s driver for this example. While it can work, I found it made display updates much slower (I need to research this a bit more to find out how/if it can be fixed).
One other potential issue: by default, the display driver (like the other module drivers) waits up to 3 milliseconds to receive a response during write verification. This is fine for physically-connected modules, but network-connected modules need a bit more time. This could possibly be worked around by adding a “SPI read delay” property to IGoPort that would return an appropriate value for higher-latency ports.
Unit Testing
One final feature: since everything a module driver needs to do is processed through the IGoPort object it receives during instantiation, it’s very easy to build unit tests to verify driver behavior. Using a framework like Moq, you can pass a mock IGoPort object which verifies that the driver’s methods are sending the expected SPI messages to the module.
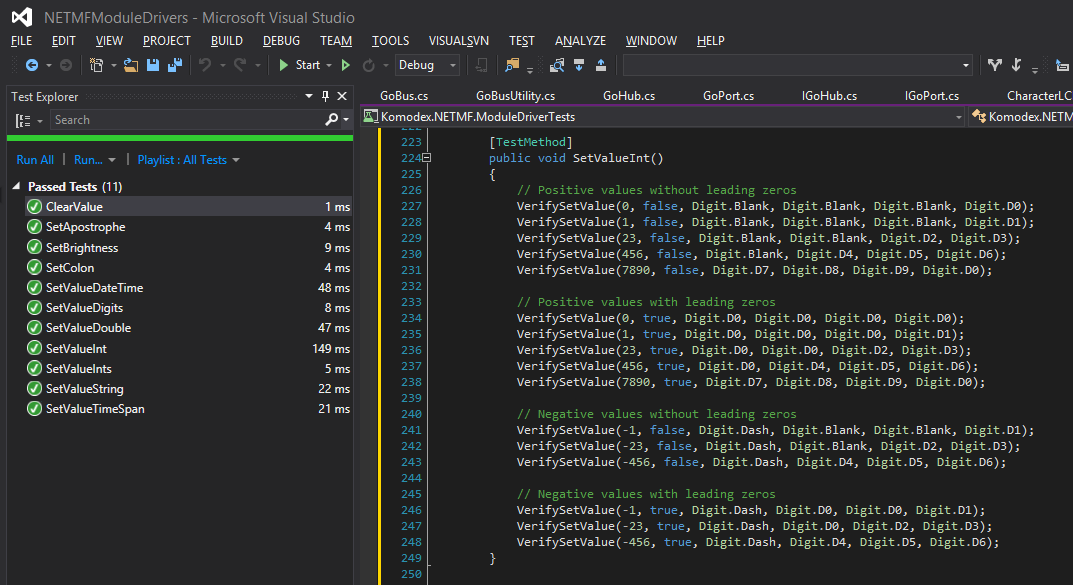 I created a collection of unit tests for my Seven Segment Display driver to demonstrate this. The mock IGoPort verifies that the driver sends the correct digits to the display over SPI (and also verifies that the driver attempts to read back the written values).
If you use Visual Studio’s built-in unit testing framework (as I did) the drivers will be executed in the context of the desktop framework rather than the .NET Micro Framework. This isn’t ideal, but it didn’t seem to cause any significant issues in my testing. There are some subtle differences between the desktop and micro frameworks that may arise during testing, however. For instance, I discovered that while char.ToUpper() is an instance method on NETMF, it’s a static method on the desktop framework — this prevented one of my driver’s methods from completing successfully. (I was able to work around this by changing the way the method was implemented.)
A better solution would be to use the NETMF emulator to run unit tests. There are a few NETMF unit testing libraries available, including MFUnit and MFUnitTest. NETMF doesn’t support generics and probably other language features that Moq needs, so you’d also need to implement your own mock IGoPort class to pass along to the module driver.
I did actually find a bug in the Seven Segment Display driver while writing these tests, so they served at least some benefit 🙂
Download
You can browse the source code for this library online, or download it as a zip file here. This includes the GoBusExperimental library, some sample projects, and modified module drivers for use with this library.
I’ve included three versions of the core GoBusExperimental project: a “base” version (for any board), a version for the Netduino Go, and a version for the Netduino 3 Wi-Fi. The board-specific projects just link to the files from the base project. You can see the board-specific conditional compilation blocks in the static GoBus class.
With the final shipping firmware, it isn’t currently possible to run the board-specific versions on either the Netduino Go or the Netduino 3 Wi-Fi as they would interfere with the official GoBus library already deployed to the board. If you were to build a custom firmware for these boards without the GoBus library these examples should all work as intended.
Conclusion
I had a lot of fun building and experimenting with this library. It’s important to note that this vision of GoBus is significantly different than what Chris has planned for GoBus and most of the flexibility you see above would not be compatible with GoBus 2.0 as conceived.
While my Seven Segment Display and Character LCD modules won’t be able to benefit from the virtualized I/O features planned for GoBus 2.0, other planned features (such as hubs and alternate transport media) should match some of the functionality demonstrated in this post (albeit with a significantly different implementation).
If you have any thoughts on this library or if you use it for anything cool, I’d love to hear about it!
Also, be sure to check out my initial thoughts on the Netduino 3 Wi-Fi.
Follow me on Twitter: @mattisenhower