Over the past week I’ve been taking a look at Windows IoT Core running on a Raspberry Pi 2. Windows IoT Core is a powerful new operating system from Microsoft that currently runs on the ARM-based Raspberry Pi 2 and the Intel-powered, x86-based MinnowBoard Max.
Until now, the Raspberry Pi has mostly run a collection of Linux-based operating systems. Microsoft, as part of their recent push into the IoT market, is looking to change this by releasing a version of Windows that runs on these more resource-constrained devices. The result is Windows IoT Core, a surprisingly strong first step into a segment previously dominated by Linux.
In this post I’ll be taking a look at the Raspberry Pi 2’s hardware, followed by an overview of Windows IoT Core. At the end I’ll show a sample project that integrates with and enables the use of Netduino Go modules with this new platform.
Raspberry Pi 2
The Raspberry Pi 2 Model B is the successor to the extremely popular Raspberry Pi Model B. It’s faster than the original and features a new Arm Cortex-A7 CPU from Broadcom. It has double the memory of the original, now at 1GB of RAM. It runs all the same Linux distributions as its predecessor and boots from an SD card. (The Pi 2 and Pi Model B+ actually have a MicroSD slot on-board rather than a full-size SD card slot.)
As for the Raspberry Pi 2’s hardware, well… it’s a Raspberry Pi. It’s built to a cost. The Pi’s build quality is nowhere near what you get with any Netduino model, but it’s also a lot cheaper than a similarly-equipped Netduino. Everything about this board and its construction is cheap.
Raspberry Pi 2 acquired! Bonus: fewer shards of fiberglass on the edges trying to cut me than the previous model. pic.twitter.com/khdNQklh4Y
— Matt Isenhower (@mattisenhower) May 2, 2015
(I actually had to file down the edges of my Raspberry Pi Model B to prevent it from stabbing me.)
I’m frustrated by some of the design choices made on this board. There is an unlabeled 40-pin header that provides access to GPIOs, two SPI buses, an I2C bus, and power/ground. Not a single pin is labeled. Each time you go to plug something in you have to refer to a separate diagram and count pins from the edges to see where it should go. It doesn’t help that the pins are arranged in a seemingly random order, too.
Even if they wanted to add labels in a future revision, there’s no room since the header is so close to the edge of the board. It’s unlikely that this header will be moved, too, since it’s part of a shield-like accessory standard called Raspberry Pi Hats. (Yes, Pi accessory boards are seriously called “hats”.)
The only way to power the board is through a Micro USB port. There is no DC barrel jack or auxiliary input, and you’re not going to get too far by plugging it into a standard 500mA USB port, either. Even a beefier 1A adapter has some trouble:
Twice now RPi2 has rebooted when plugging in a 7seg module. Probably due to 47uF cap on 5V line charging. Need to try another USB adapter. — Matt Isenhower (@mattisenhower) May 4, 2015
(I should note that Go modules are not meant to be hot-pluggable. Don’t try this at home, folks.)
I could go on, but the message is clear: if you buy a Raspberry Pi, you’re buying it for what you can do with the board, not for any actual or perceived build quality.
Sorry, We’re Closed
One thing I neglected to mention in my review of the Netduino 3 Wi-Fi was that it, like most other pieces of “maker-oriented” hardware, is completely open source. You can download its schematic and PCB layout files, you can download every line of source code it uses, you can buy every component on the board from the usual vendors. It’s open.
The Raspberry Pi 2 is not open. The schematic for it is not posted anywhere, and only limited schematics are available for the previous models. This is actually part of their business strategy. Raspberry Pi’s Pete Lomas wrote about this strategy in an op-ed for Wired: Raspberry Pi’s Secret: ‘Sell Out a Little to Sell a Lot’.
Even the components on this board are obscured. The Raspberry Pi 2 is based on the new BCM2836 SoC from Broadcom. Here’s a link to it on their site. Just kidding, that’s a 404. Broadcom doesn’t even list the chip on their site — good luck trying to buy it from them.
But at $35-40, the Pi 2 is dirt cheap, and that seems to be enough for people to overlook these issues. Even if you wanted to use this board in a medium-scale deployment, it would be cheaper to buy a few hundred Pis and build something on top of them than to try to recreate or modify the board yourself.
Aside: Open-Source Hardware
With that said, I do understand where they’re coming from with their choice to keep things closed.
I’ll let you in on a secret: the reason OSHW projects can release schematics and board layout files and still remain in business is that the vast majority of them face no real threat from third parties looking to clone their boards. In most cases, the originals can be manufactured for less money than the clones. This is mostly due to economies of scale: the price of making hardware plummets as quantities increase, and overall demand for most OSHW gear is low enough to remove any incentive for making clones.
But when demand for a product goes up, the incentive for cloners returns. As of February 2015, over five million Raspberry Pis have been sold. That’s huge. And if you’ve ever tried to buy a Pi from one of the primary distributors (Allied, Element14, etc.) you’ll know they can barely keep them in stock. If the Raspberry Pi Foundation published board layouts and BOMs, the market would be absolutely flooded with cheap knock-offs and clones overnight.
This is not to say that other projects releasing schematics is merely a PR move — board schematics can be an invaluable resource for learning, and crucial for those needing to build derivative designs for custom implementations. But in some cases, the decision to remain closed makes sense.
(And yes, I see the irony in complaining about closed-source hardware while embracing the availability of Windows IoT Core.)
Windows IoT Core
Let’s get this out of the way first: Windows IoT Core is completely and utterly different from anything you might be familiar with from the .NET Micro Framework. Windows IoT Core has far more in common with a full desktop PC OS than NETMF or anything you’d typically consider running on a piece of $35 hardware.
In fact, this is a full OS. It has a file system. It has to boot. It has processes and services and runs graphical applications. It supports peripherals like USB keyboards and mice. It uses ACPI to access things like SPI buses. By all accounts this is a PC and Windows IoT Core is basically a stripped-down version of Windows RT (or perhaps Windows Phone) with extra APIs for additional hardware functionality.
Comparing Windows IoT Core to NETMF is like comparing apples to oranges. IoT Core is significantly more complex and targets much different scenarios than NETMF, while NETMF is much simpler, much more flexible, and much easier to adapt to specific needs.
Documentation
Windows IoT Core has barely been out for a week and it already has better documentation than a lot of other, more established products. Look at this Getting Started page. You click the board you have, follow the steps provided, and boom, you’re up and running. It couldn’t be easier.
Here’s the main documentation page. Make sure you check out the “Samples” tab. These samples are seriously impressive — there’s well-written, well-illustrated, clear, and cohesive documentation for everything you could want. A blinking LED complete with a GUI to control it. Basic GPIO and buttons. I2C. SPI. Even an async web server. Want to build some device drivers? (Who wouldn’t!) Knock yourself out.
Here’s an extensive list of command line utilities. Here’s the image creation process. You want it, they’ve documented it.
There’s also a collection of sample projects on hackster.io and code on GitHub.
This alone sets IoT Core apart from many other platforms, and it’s incredibly impressive to see the lengths Microsoft has gone to with this kind of documentation.
Writing Apps
Windows IoT Core runs Universal UAP UWP Windows applications. Both Windows 10 and Visual Studio 2015 are required to develop these applications for IoT Core.
Before you go to set up a VM, Microsoft says you need a physical Windows 10 installation to prepare the SD card necessary to boot Windows IoT Core on the Pi.
If you’ve ever used the VS Remote Debugger to deploy and debug applications across the network, this is the same process. The remote debugger is started automatically for you on IoT Core, so all you have to do is configure Visual Studio to connect to your device. Microsoft covers the deployment process here.
Beyond that, the rest is mostly the same as building any other universal Windows app. You have XAML, you have C# (or C++, or HTML/WinJS…), you have the WinRT libraries. And things seem to just pretty much work.
As a test, I put the Bonjour library I developed for Remote into a UWP app and deployed it to the Pi. It worked. This is a fairly complex library that uses multicast sockets, async/await, background threads, etc. and for the most part it all just worked without modification. (I did notice that some incoming messages were occasionally missed, however, so there may be some issues with multicast groups — I need to research this a bit further.)
Performance and Behavior
Windows IoT Core is a prerelease product, so any talk of performance at this stage is a bit premature. The same goes for some of the behavioral oddities I’ve noticed. Still, it’s interesting to make a few comparisons to other devices and platforms.
GPIO
First, let’s talk GPIO performance. One of the simplest tests you can perform is to just switch a GPIO pin on and off in an endless loop, i.e.:
var gpioController = GpioController.GetDefault();
var gpioPin = gpioController.OpenPin(27);
gpioPin.SetDriveMode(GpioPinDriveMode.Output);
while (true)
{
    gpioPin.Write(GpioPinValue.High);
    gpioPin.Write(GpioPinValue.Low);
}
When I run this test on my Raspberry Pi 2, the pin cycles at a frequency up to about 5 kHz. It doesn’t seem to matter whether I run this as a foreground (GUI) or background app, 5 kHz is about the fastest it can go.
For comparison, this same test on a Netduino 3 Wi-Fi runs at about 20 kHz. Fellow Netduino fan Mark Stevens tested his Pi 2 with memory-mapped GPIO and got it to reach 41 MHz. That’s MHz, not kHz.
It’s also worth noting when I say “up to 5 kHz” I really mean the “up to” part. As mentioned earlier, this is a full OS with other background processes and services, all of which can interfere with the performance seen in other parts of the system. Even just moving the mouse around the screen seems to slow down the cycle speed when the GPIO test is running.
As far as actual GPIO pin behavior, I noticed that none of the pins seem to support pull-up or pull-down resistor modes (at least when used with IoT Core). I’m not sure if this is a hardware limitation or simply something that has yet to be implemented.
I also noticed issues with ValueChanged events generated by pulse signals on GPIO lines, but this appears to be a known issue that will be addressed in a future update.
SPI
SPI performance is a much different story from GPIO performance. The SPI bus is clearly hardware-driven and has no trouble reaching speeds in the MHz range. During transmission there is a slight delay (about 25-50 μs) to refill the output buffer every 16 bytes, but transfers are still very fast overall.
SPI CS line selection is limited to bus-specific pins, which I assume is because of the hardware-driven nature of the SPI buses. There are 2 CS lines on the first SPI bus (SPI0) and 1 CS line on the second bus (SPI1). Unfortunately it doesn’t appear to be possible to specify a CS line of “none” (e.g., if you wanted to manually use an arbitrary GPIO line as your chip select line). One workaround would be to leave the hardware CS line disconnected and manually assert/deassert a GPIO line before and after each SPI message.
I had some trouble receiving data on the second SPI bus, SPI1. Incoming data seems to be shifted by about 3 bytes, and in SPI Mode1 the actual incoming bytes are incorrect as well. (Bug filed here.)
XAML UI
Measuring XAML performance is a bit more difficult. The best way to do this would probably be to look at the average FPS and compare it to other devices, but I haven’t done too much testing with this yet.
From my initial tests, though, I’d say XAML performance is “ok” but not great. There’s definitely quite a difference between applications running on the Pi and applications running on a desktop PC. Even something simple like drawing an arc seems to slow things down, but not so much as to make it unusable. Enabling any sort of animation or custom interactions will likely require careful performance optimization and tuning.
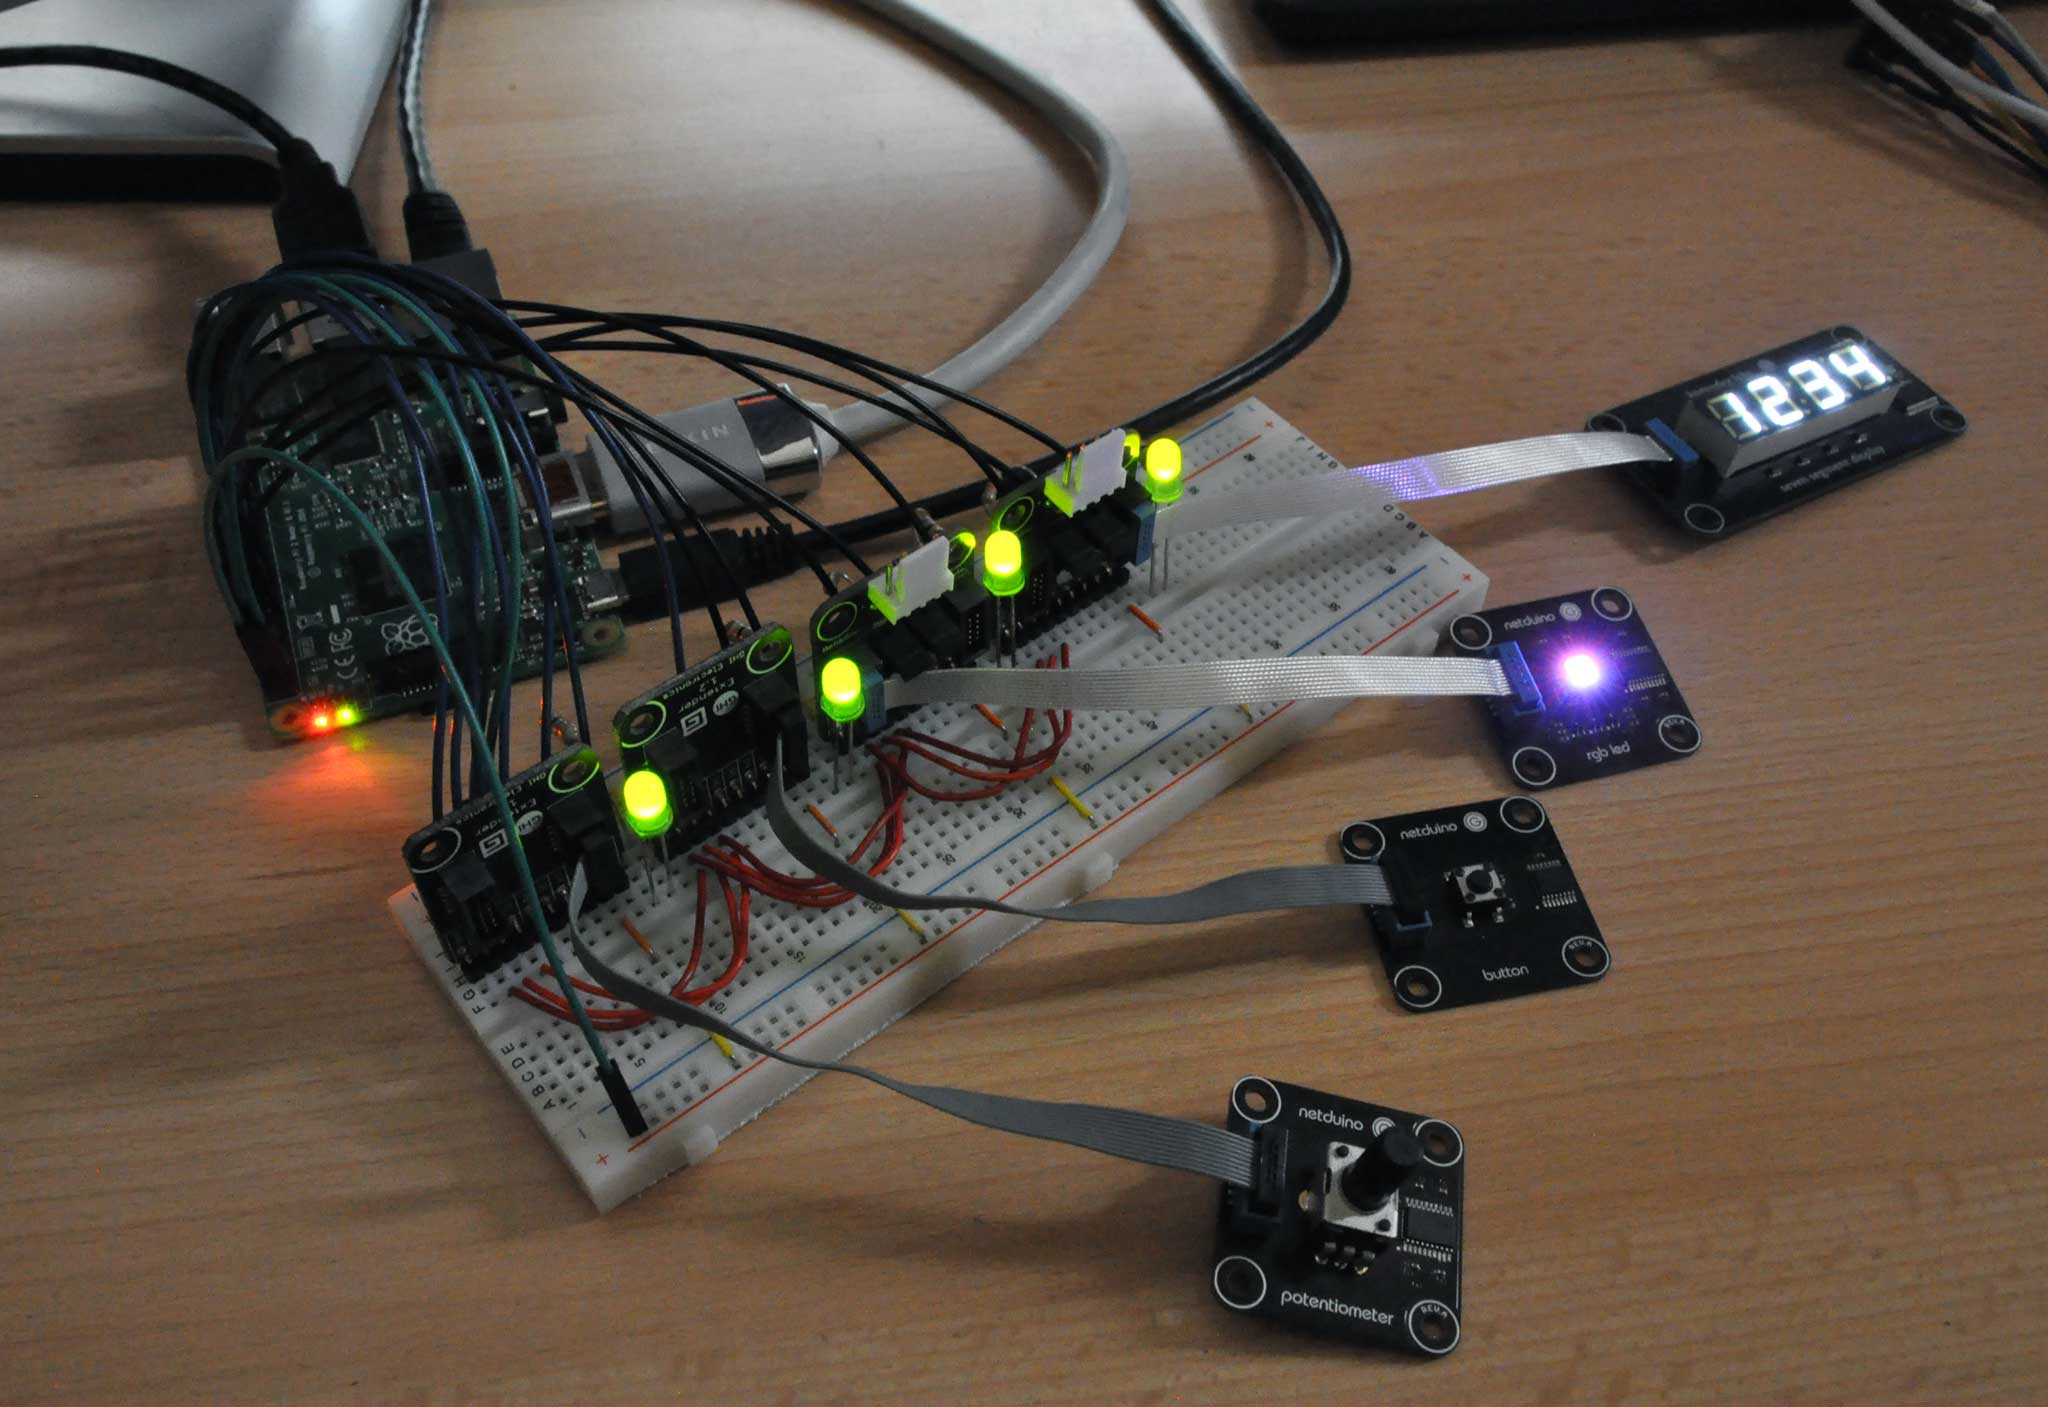
GoBus on Windows IoT Core
For a first project, I decided to port my experimental library for Netduino GoBus modules to Windows IoT Core. I wrote about this library in a previous post here with an explanation of its overall design and a few examples of its use.
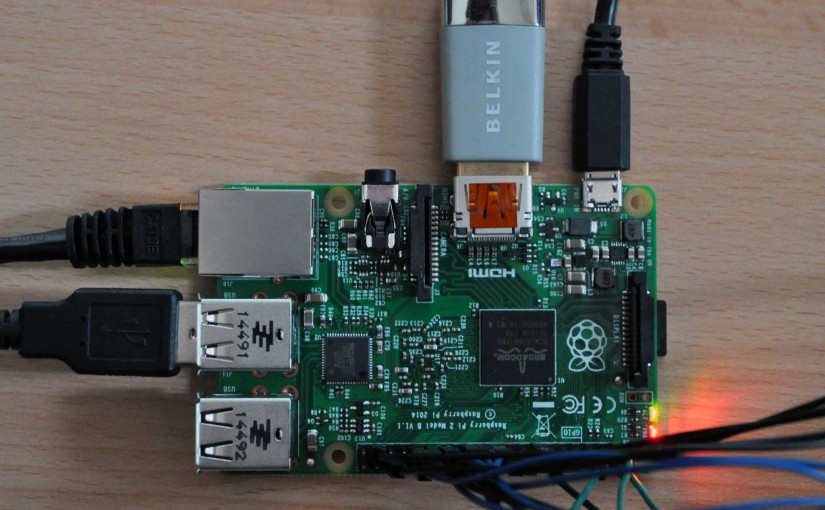
You can see the four-port GoBus “hub” connected to the Raspberry Pi 2 above. All four ports are connected to SPI0 (due to the issue I mentioned above with reading bytes) and they each have their own LEDs used to indicate a successful connection.
Porting this library to use the IoT hardware libraries was pretty straightforward. Most parts of the library remained unchanged, but I did have to rewrite GoPort and GoHub to take advantage of the new hardware classes.
I did run into some trouble with the firmware included with the potentiometer and RGB LED modules, however. This firmware is known to have some framing issues, but for some reason these issues became much worse when I attempted to use these modules from the Pi’s SPI bus. I suspect this was caused by the slightly different SPI transmission method used on the Pi (with a slightly longer delay between individual bytes), but I was never able to determine an exact cause.
Fortunately, I was able to resolve the issues by replacing the firmware with a new version I created based on my seven segment display module’s firmware.
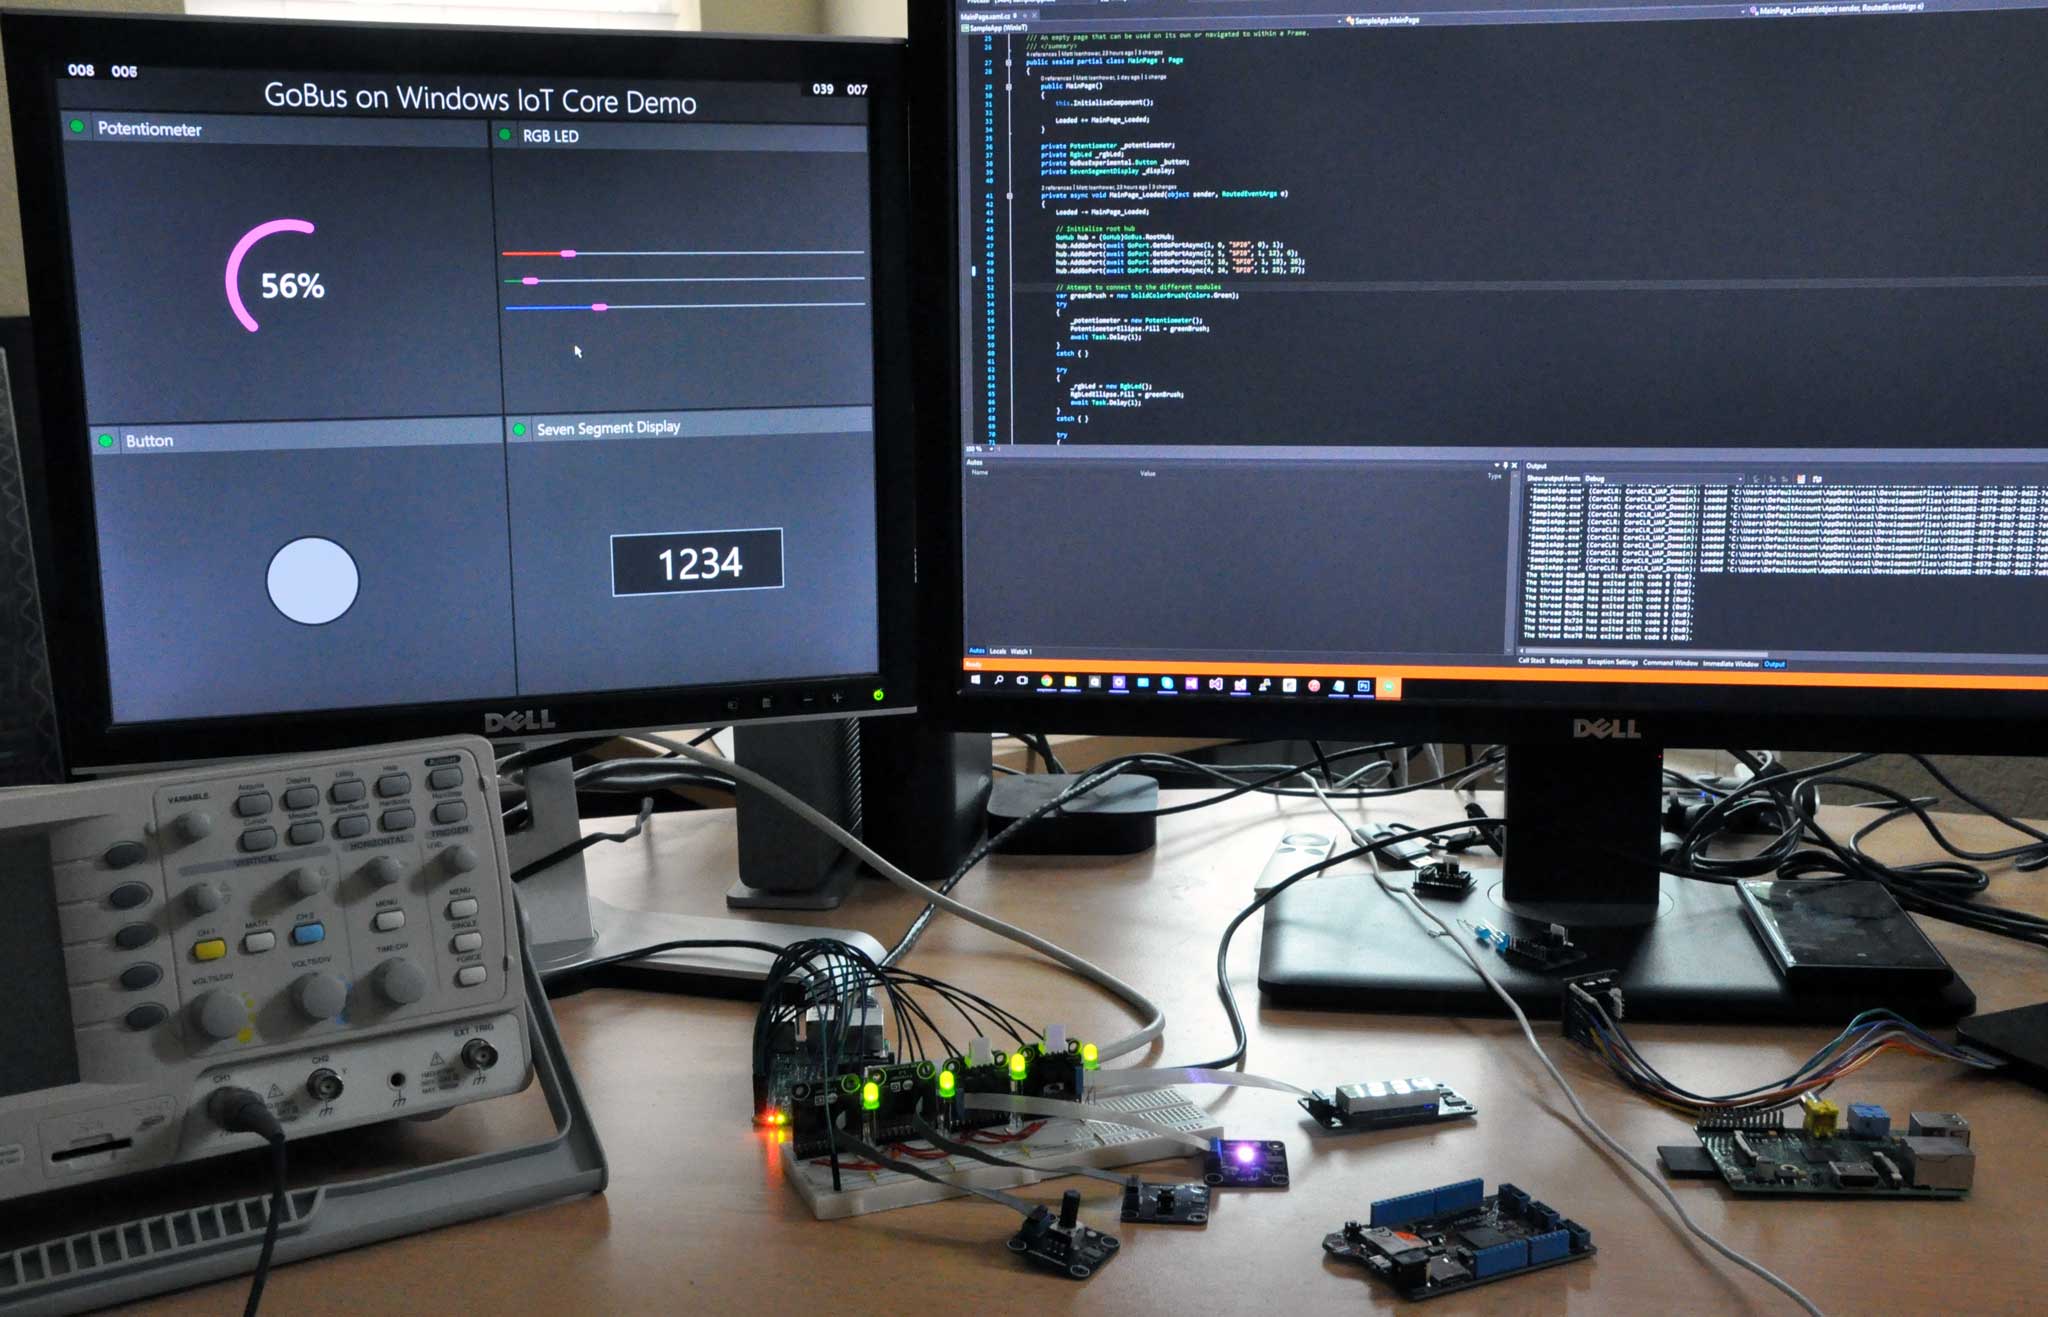
To demonstrate the GoBus library running on Windows IoT Core I wrote a C#/XAML app that connects to four different Go modules and displays their status on-screen. In the above photo, the monitor on the left is connected to the Raspberry Pi 2.
On the left side of the screen, you can see the current status of the potentiometer and button modules. On the right, you can use sliders to change the color of the RGB LED and change the value that appears on the seven segment display by typing in the textbox in the corner.
Currently the app just constantly cycles through, updating each module in a loop, but it would be much better to push this off to a background thread, freeing up the UI thread while SPI communication is in progress.
Code
You can browse the code for this sample online here, or download it as a zip file here. There are now two VS solution files included: one for NETMF and one for WinIoT. As mentioned earlier, I have a more in-depth explanation of this GoBus library in a separate post available here.
Conclusion
Overall, I’m very impressed with Windows IoT Core. While I haven’t tried running any particularly complex UWP apps on it, every bit of UI I’ve tried so far has worked (although bit more slowly than on a PC). UI performance is certainly more than adequate though, and a bit of slow-down is to be expected when running on such low-end hardware.
For what it is, the Raspberry Pi 2 works and seems to work pretty well. I’m not thrilled with the hardware quality, but it certainly is cheap, and I didn’t run into any major issues while using it.
I really would like to see some higher-quality ARM-based boards for this platform, though. I expect we’ll see some more options emerge in the coming months, but it’s going to be difficult for other boards to compete with the Pi’s price level. (For comparison, while not an ARM board, the MinnowBoard Max retails for about $150.)
We’re still in the very early stages of this platform, and it’s exciting to think about its future possibilities. I definitely look forward to seeing what others come up with and developing more applications for it myself.
Follow me on Twitter: @mattisenhower
Update, August 6, 2015: Windows 10 and build 10240 of Windows IoT Core are now generally available. Fixed some links in this post and other information.
Excellent review. 🙂
I am playing around with Windows 10 IoT core too and noticed that Debugging C# projects are better than Node JS projects. VS constantly drops connection when I try to deploy NodeJS projects.
nice write-up.
Particularly interested in the GPIO performance which is poor to say the least!
Can you do the same test using Lighting?
Thanks for the excellent review.
I am playing with the Bonjour library, have you managed to run the Bonjour service in the IoT ? I am struggling to run that in IoT.
any help in this matter is much appreciated.
Thanks,
Das
Hello,
I’m looking into integrating a Bonjour library into a background app for a personal project. You mention your Bonjour library in your post. Is it proprietary or is it open source ?
If it’s not open-source, do you happen to know of any ?
Many thanks !
Stefan.